

We are reader supported. When you purchase through links on our site, we may earn an affiliate commission. Also, as an Amazon affiliate, we earn from qualifying purchases.
Oblique strains are side muscle injuries that can stop athletes and active people fast. They hurt when you twist, cough, or take a deep breath. They can linger if you rush back too soon. This guide explains what they are, why they happen, how to treat them, and what to do to return stronger. The goal is clarity and action.
What Is an Oblique Strain
Your obliques are the muscles on the sides of your abdomen. You have external obliques on top and internal obliques underneath. They rotate your trunk, stabilize your spine, transfer force between your hips and shoulders, and help with breathing and bracing. Every swing, throw, and serve uses them.
An oblique strain is a tear of these muscle fibers or their tendon attachments. It can happen on the side of your lead arm or your trail arm depending on your sport pattern. The pain often sits near the lower ribs or along the side of the abdomen and can refer around to the back.
How Oblique Strains Happen
Common triggers in sport
- Explosive rotation such as baseball or softball swings, tennis serves, and golf drives
- Sudden trunk deceleration after a throw or serve
- Overreaching for a ball while twisting
- Poor warm up followed by maximal efforts
- Training spikes in volume or intensity
Everyday causes
- Twisting while lifting or carrying
- Prolonged coughing or sneezing bouts
- Slip or trip with a sudden twist
Risk factors
- Weak trunk and hip stabilizers
- Limited thoracic spine or hip rotation
- Asymmetry between sides
- Fatigue, dehydration, poor sleep
- History of oblique or intercostal strain
Symptoms You Should Recognize
- Sharp or pulling pain on the side of the abdomen or near the ribs
- Pain with twisting, side bending, sit ups, coughing, sneezing, or deep breathing
- Tenderness to touch along the muscle or between ribs
- Stiffness and protective guarding
- Sometimes mild swelling or bruising
- Sensation of a tug or pop at the moment of injury
- Reduced power when throwing, swinging, or serving
How Serious Is It
Grading the injury
- Grade 1: Minor microtears. Local soreness, minimal strength loss. Return often in 1 to 3 weeks with proper rehab.
- Grade 2: Partial tear. Clear pain and weakness, possible swelling. Return in 3 to 6 weeks depending on load and position.
- Grade 3: Full thickness tear. Severe pain, significant loss of function. May require longer rehab and specialist care.
When To See a Clinician
- Severe pain or a sudden pop with immediate weakness
- Pain that persists at rest after a few days
- Visible bulge in the abdominal wall or suspicion of hernia
- Fever, nausea, or deep flank pain that could suggest organ involvement
- Breathing pain that limits normal inhalation
- Previous rib fracture or trauma to the chest or abdomen
A sports medicine clinician or physical therapist can grade the strain and guide safe progression.
Diagnosis: What To Expect
- History and symptom review including the moment of injury
- Palpation along the obliques and rib margins to locate the tender point
- Resisted trunk rotation and side bending to test strength and pain response
- Breathing assessment and rib motion
- Imaging if needed. Ultrasound can show muscle or tendon tears. MRI can define extent in stubborn cases.
Pain at the lower ribs may overlap with intercostal muscle strain. Rib fracture is less common but more serious. A trained provider can differentiate.
First 72 Hours: Calm The Fire
Protect and reduce stress
- Use relative rest. Avoid twisting, heavy lifting, or explosive moves.
- Breath calmly. Shallow breathing increases guarding and stiffness.
Cold, compression, and comfortable positions
- Apply cold packs 10 to 15 minutes, 2 to 4 times per day to limit pain. Wrap the pack in a thin towel.
- Light compression from a soft belt or binder can reduce movement and pain early on.
- Sleep on your back with a pillow under your knees or on the uninjured side with a pillow between knees.
Gentle activation
- Diaphragmatic breathing. Inhale through the nose, expand ribs sideways, exhale longer than you inhale.
- Pelvic tilts and easy marching while lying on your back if pain allows.
Rehab Timeline and Key Exercises
Progress only when daily activities are pain manageable. Stop any exercise that causes sharp or lasting pain. Smooth and controlled is the rule.
Phase 1 Pain control and activation days 1 to 7
- Breathing 90 90 with feet on a wall. 3 to 5 sets of 5 slow breaths. Focus on rib expansion and gentle abdominal tension.
- Abdominal bracing. Supine position, brace the trunk as if preparing for a light jab. Hold 5 to 10 seconds. 8 to 12 reps.
- Isometric anti rotation press dead bug variation. Hold a light resistance band or cable in front of chest and resist rotation. 3 sets of 10 to 20 second holds each side.
- Gentle mobility. Cat cow, open book thoracic rotations within pain free range. 1 to 2 sets of 5 to 8 each side.
Criteria to progress: walking and daily activity with minimal pain, able to brace and breathe without pain, tender area improving.
Phase 2 Strength and controlled rotation weeks 2 to 3
- Pallof press standing or half kneeling. 3 sets of 8 to 12 each side.
- Side plank modified on knees progressing to full. 3 sets of 15 to 30 seconds each side.
- Dead bug or hollow hold variations that do not increase pain. 3 sets of 6 to 10 reps or 15 to 30 second holds.
- Cable or band anti rotation walkouts. 2 to 3 sets of 5 to 8 steps each direction.
- Progressive thoracic rotation mobility. 2 sets of 8 to 10 reps.
Criteria to progress: able to plank and press without pain, cough or sneeze with minimal discomfort, no pain with light sport specific drills.
Phase 3 Power, speed, and return to sport weeks 3 to 6 plus
- Rotational med ball scoop toss light to moderate load. 3 sets of 6 to 8 each side. Start at 50 percent effort.
- Cable chops low to high and high to low. 3 sets of 8 to 10 each side at moderate load.
- Anti rotation with dynamic footwork. Lateral shuffles while holding a band. 3 sets of 10 to 15 seconds.
- Sport drills. Dry swings, shadow serves, easy throws. Build volume and intensity gradually.
Return only when you can sprint, twist, and perform full effort sport skills without pain during or after. Follow the two day rule. If symptoms spike, drop back a step for 48 hours.
Sport Specific Notes
Baseball and softball
- Pitchers often feel pain on the lead side during late cocking and deceleration. Build back with flat ground throws and short pitch counts.
- Hitters should start with tee work, progress to soft toss, then live batting practice.
- Keep a throwing or hitting log. Add no more than 10 to 15 percent volume per week.
Tennis and pickleball
- Serves stress the lead side external oblique. Begin with half serves focused on rhythm before power.
- Practice split step and footwork to reduce reaching and twisting under fatigue.
Golf
- Reduce bucket size early. Use partial swings to rebuild sequencing.
- Train glute strength and hip rotation to offload the trunk.
Running and fitness
- Shorten stride and avoid hills early if breathing provokes pain.
- Substitute cycling or walking while pain calms if needed.
Taping, Bracing, and Helpful Gear
Tools can reduce pain and support the area while you recover. They do not replace rehab. Choose products that match your stage and needs.
McDavid Waist Trimmer Belt
This adjustable neoprene belt provides mild compression and warmth around the lower ribs and abdomen. It helps early on to limit painful trunk motion and reminds you to move with control.
- Why it helps Mild compression can reduce movement pain and enhance body awareness during daily tasks and light training.
- Best for Early phase support, desk work, walking, gentle exercise.
- Potential downsides Not a rigid brace. Can get warm with prolonged wear. Remove during high intensity training to avoid overreliance.
KT Tape Pro Kinesiology Tape

Elastic tape can offload the injured area and improve sensory feedback. It allows full movement while cueing you not to over twist.
- Why it helps Gentle skin lift and proprioceptive input may reduce pain perception during movement.
- Best for Transition from rest to training, light hitting or serving sessions, runs where coughing or side stitches flare.
- Potential downsides Effect sizes vary. Requires proper application. Skin sensitivity is possible.
FlexiKold Gel Ice Pack Large
A large reusable gel pack conforms to the side and rib area. Use in the first days for pain control, or after hard rehab sessions later.
- Why it helps Cold reduces pain and helps control reactive soreness to keep you progressing.
- Best for First 72 hours, post practice cooldown, evening pain spikes.
- Potential downsides Temporary relief only. Use a thin barrier to protect skin.
Pure Enrichment PureRelief XL Heating Pad
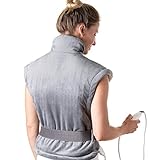
After the acute phase, heat can relax guarding and improve tissue pliability before mobility work or practice.
- Why it helps Warmth reduces muscle tone and prepares the trunk for gentle rotations and bracing drills.
- Best for Pre rehab warm up, persistent tightness, cooler training environments.
- Potential downsides Do not use if the area is acutely inflamed. Avoid falling asleep on high heat settings.
TENS 7000 Digital TENS Unit
This portable unit uses electrical stimulation to modulate pain. It can help you move more naturally while the tissue heals.
- Why it helps Neuromodulation may reduce pain signals and improve tolerance to rehab tasks.
- Best for Short sessions before or after exercises, stubborn pain that limits breathing or rotation.
- Potential downsides Not for use over the chest if you have a pacemaker or heart issues. Follow instructions and consult your provider if unsure.
TriggerPoint GRID Foam Roller 13 inch
A firm roller helps mobilize the thoracic spine and lats. Improving those areas reduces strain on the obliques during rotation.
- Why it helps Better thoracic extension and rotation means the trunk shares load across more joints.
- Best for Warm ups, cool downs, mobility circuits, travel friendly recovery.
- Potential downsides Avoid direct rolling on the painful oblique early on. Focus on upper back and surrounding tissues.
Biofreeze Menthol Pain Relief Gel
A topical analgesic can take the edge off pain and let you complete rehab sessions at the planned dose.
- Why it helps Cooling sensation and menthol analgesia can reduce perceived pain for short periods.
- Best for Pre rehab application, game day warm ups once you are cleared to play.
- Potential downsides Temporary effect. Avoid broken skin or mucous membranes.
Under Armour HeatGear Compression Shorts
High quality compression shorts provide gentle support to the hips and lower trunk during running, fielding, or light practice.
- Why it helps Compression enhances proprioception and may reduce excessive trunk sway.
- Best for Mid to late rehab stages, controlled return to practice, travel days.
- Potential downsides Choose the right size. Too tight can irritate the area.
NYOrtho Abdominal Binder
A wide, adjustable binder offers more coverage than a slim belt. It can be useful early after a moderate or severe strain when movement sparks pain.
- Why it helps Broad compression reduces shear forces during walking and light chores.
- Best for Early daily support, manual labor modifications, long standing periods.
- Potential downsides Not for heavy training. Use for limited periods to avoid dependency.
Daily Habits That Speed Recovery
- Sleep 7 to 9 hours. Tissue repair happens mostly overnight.
- Eat enough protein across meals. Aim for 20 to 40 grams per meal depending on body size and needs.
- Hydrate. Dehydration increases cramp risk and perceived pain.
- Walk daily. Comfortable movement improves circulation without stressing the oblique.
- Respect pain. A small ache that fades is fine. A sharp or escalating pain is a stop sign.
Prevention After You Heal
Warm up with purpose
- 5 minutes of general heat such as brisk walk or bike
- Thoracic mobility such as open books and rib expansion breaths
- Trunk activation including dead bugs, side planks, Pallof presses
- Gradual build into full speed swings, serves, or throws
Train rotation smart
- Mix anti rotation with controlled rotation
- Progress velocity slowly. Add only one variable at a time such as speed or volume
- Use both sides to reduce asymmetry
Manage load
- Track weekly exposure such as number of swings or throws
- Limit large jumps in volume or intensity
- Plan hard, moderate, and easy days
Technique and equipment
- Get a coach to assess mechanics in your sport
- Use appropriate grip sizes and shaft flex in racket or golf gear
- Footwear that supports your movement pattern reduces unnecessary trunk compensation
Frequently Asked Questions
How long does an oblique strain take to heal
Most grade 1 strains improve in 1 to 3 weeks. Grade 2 strains need 3 to 6 weeks. Grade 3 strains can take longer and need specialist care. Sport, position, and workload change the timeline.
Is it safe to stretch the oblique early
Aggressive stretching early can irritate the injury. Focus on breathing, gentle mobility, and isometrics first. Add rotation once daily pain is low.
Can I keep training
Yes, with modifications. Avoid painful twisting. Train legs and upper body with neutral trunk positions. Keep aerobic work with low trunk stress. Maintain fitness while you heal.
Do I need imaging
Not always. Many cases are diagnosed clinically. Imaging is useful for severe injuries, slow progress, or to rule out other issues.
Why do oblique strains recur
Common reasons include returning too fast, poor load management, limited thoracic or hip mobility, and weak trunk and hip stabilizers. A structured return plan reduces risk.
Sample Weekly Return Progression
This is a template. Adjust to symptoms and your sport demands.
- Week 1: Pain control, breathing, isometrics, walking. No twisting.
- Week 2: Pallof press, side planks, dead bugs, light cable chops. 5 to 6 out of 10 effort.
- Week 3: Add med ball work and sport drills at 50 to 70 percent effort. Short sessions.
- Week 4: Full strength work and controlled scrimmage. 70 to 85 percent effort. Monitor next day response.
- Week 5 plus: Full speed practice then competition once you pass return criteria.
Clear Return To Play Criteria
- No pain with daily life, coughing, or sneezing
- Full trunk range of motion without pain
- Symmetric strength on side plank and Pallof press
- Sport skills at game speed without pain during or the day after
- Confidence in the area with no guarding
What To Avoid
- Rushing back because the calendar says so
- Maximal rotation too soon
- Training spikes after a few good days
- High volume sit ups or Russian twists early on
Simple Home Routine For Busy Days
- 5 minutes brisk walk
- 3 sets of 5 slow diaphragmatic breaths
- 2 sets of 8 Pallof presses per side
- 2 sets of 20 second side plank holds each side
- 5 light open book rotations per side
Total time is under 15 minutes. Consistency matters more than long sessions.
Key Takeaways
- Oblique strains come from high speed rotation, poor load control, and limited mobility
- Early calm, controlled breathing, and isometric loading set the stage for healing
- Progress from anti rotation to rotation, then to power and speed
- Use smart tools for support but rely on a plan, not gadgets
- Return when you meet objective criteria and the next day feels fine
Conclusion
Oblique strains are common and frustrating, but they are manageable with a clear plan. Reduce pain early, activate the trunk safely, and progress to power at the right pace. Support the process with smart gear, good sleep, and steady habits. When in doubt, get a professional assessment and follow a progressive program. Build back your rotation, protect your side, and return to play with confidence.